My Very Own Domain!

The Husby bought me my very own domain for Christmas!  Please update your subscriptions accordingly, as I’ll now be bringing you my yummy food recipes from my new site, www.TheJeyofCooking.com!

Also, The Jey of Cooking now has a Facebook Fan Page!  You can become a fan by clicking the “like” box in the upper right corner of the page of the new site.

Rosemary Parmesan Shortbread.

For a “Secret Santa” gift exchange, I was asked to make a savory treat to counteract all of the sweets that are so readily available this time of year.  I was intrigued by this recipe, as it called for powdered sugar in addition to the parmesan and rosemary.

The Husby walked into the kitchen while these were in the oven and said,

“Are you making fettuccine alfredo?  I thought you were baking today.”

Overall, I was pretty pleased with these.  They’re definitely different, but the balance of the sweet and savory was just right.  And even though they were met with mixed reactions from those who tried it (the Husby wasn’t a fan but the Fruitaholic kept asking for more), I can see myself making these again and serving them alongside a nice big bowl of pasta.


Rosemary Parmesan Shortbread – from Food Network

– 2 Cups Flour

– 1 Cup Confectioners Sugar

– 2 tsp. Fresh Rosemary, finely chopped

– 1/2 tsp. Salt

– 1/2 Cup Grated Parmesan

– 2 Sticks Unsalted Butter, at room temperature

– 1 tsp. Water

Using a hand mixer, combine the flour, sugar, rosemary, salt and parmesan.  Add the butter and water and pulse until a soft dough forms.

Spread a large sheet of plastic wrap onto a work surface and transfer the dough onto it.  Form the dough into a log along the long edge of the plastic wrap.  Roll the log into the plastic wrap and twist ends until the log is tight and compact.  Chill in the refrigerator for 1 hour, until firm.

Preheat oven to 375 and line a baking sheet with parchment paper.   Slice the log into 1/3 inch thick slices and arrange on baking sheet.  Bake for 12-14 minutes, until edges begin to brown.

Cool shortbread on the baking sheet for 5 minutes before transferring to a wire rack to completely cool.  Store in an airtight container at room temperature.

Cinnamon Chip Cream Cheese Cookies.

Last week, we saw some below zero windchill temperatures here in Chicago.  Neither the Husby nor I wanted to leave the house so we placed an order through an online grocery delivery service.  It was our first time ever doing so, and I was kind of excited to peruse their selection.  I literally gasped with joy when I saw that they sold cinnamon chips.  These suckers are fairly elusive, and I was so pumped to finally find some that I ended up ordering 3 bags.

In my arsenal of recipes to try, I had found one for cream cheese cookies with Andes mint chips, and although I had a bag of mint chocolate chips in my pantry, I decided to sub it out with the cinnamon chips instead.

These cookies are deliciously light and fluffy and would be a great addition to your holiday (or everyday) baking collection.

Cinnamon Chip Cream Cheese Cookies – inspired by  and adapted from Sweet Treats and More

– 1/2 Cup Cream Cheese, at room temperature

– 1 Stick Butter, at room temperature

– 1 Cup Sugar

– 1 Egg

– 1/4 tsp. Salt

– 1/4 tsp. Baking Powder

– 1 Cup Flour

– 1 Package Cinnamon Chips

Preheat oven to 350.  Using a handmixer, beat cream cheese and butter until combined.  Add sugar gradually, then egg and salt, followed by flour and baking powder.  By hand, mix in half of the cinnamon chips.  Chill for at least 20 minutes.

Using a cookie scoop or rounded tablespoon, drop dough onto a parchment lined baking sheet.  Bake for 10 minutes until edges are just starting to brown.  Let cool for 10 minutes.

In the meantime, microwave the remaining cinnamon chips in a small bowl in 30 second increments until melted.

Pour the melted cinnamon chips into a plastic ziploc bag and snip off a small piece of the corner.  Pipe onto cookies and let cool.

Enjoy a few with a big, cold glass of milk.

Spicy Honey Brushed Chicken Thighs.

It’s been a long couple of weeks in our household.  My mom was in the hospital for a while, and since the hospital was 5 minutes away from my in laws, we temporarily moved in there for a week.  Mom’s back at home now (and so are we) so we’re slowly starting to get back into our normal routine.

Seeing as I hadn’t been to the grocery store in a while, there was no food in our fridge when we returned home.  Luckily, I came across this recipe on Tastespotting and happened to have all of the ingredients on hand, including some chicken thighs in the freezer.  This dish is really quick and easy to prepare (from start to finish in less than 20 minutes!) and incredibly flavorful.  While I served it with some rice and sugar snap peas, the Husby mentioned that it would also be great for taco meat.  We both agreed that this recipe will definitely become a staple in our house.


Spicy Honey Brushed Chicken Thighs -from Handle the Heat,  originally from Cooking Light

– 2 tsp. Garlic Powder

– 2 tsp. Chili Powder

– 1 tsp. Salt

– 1 tsp. Ground Cumin

– 1 tsp.  Paprika

– 1/2 tsp. Ground Red Pepper (I used a red and black mix)

– 8 Skinless, Boneless Chicken Thighs

– 6 Tbsp. Honey

– 2 tsp. Cider Vinegar (I used Rice Vinegar)


Preheat your broiler.  Combine garlic powder, chili powder, salt, cumin, paprika and red pepper in a gallon sized ziploc bag.  Add chicken and shake and rub to coat.

In a small bowl, combine honey and vinegar and mix well until combined.

Broil chicken for 5 minutes on each side.  Remove chicken from oven and brush with honey-vinegar mixture.  Return to oven and broil for one minute, then flip over and repeat.


BBQ Chicken Pizza.

While cleaning out my pantry, I stumbled upon a premade pizza crust I had forgotten about with the “Use By” date fast approaching, so I asked the Husby what kind of pizza he was in the mood for.

“I don’t know… how about BBQ chicken?  That sounds interesting”

DONE.

I had seen a few versions of this pizza floating around the blogosphere so I quickly got to work sorting through my bookmarks.  It just so happened that I had most of the ingredients already in the house, so with just the quickest trip to the store, I was ready to go.

This pizza had a really great flavor and was a nice change from your average tomato sauce based pizza.  I definitely recommend using a good quality barbeque sauce… I used the remainder of a really mild grocery store brand that I had used in a kiddo-friendly recipe and was kind of bummed that I hadn’t used my regular brand.

BBQ Chicken Pizza – inspired by and slightly adapted from She Cooks and Bakes.

– 1 Pre-Baked Pizza Crust

– 2 Boneless Skinless Chicken Thighs (or your preferred cut of chicken), cooked and shredded

– Barbeque Sauce

– Ranch Dressing

– Shredded Cheddar Cheese

– 1/2 Red Onion, thinly sliced

– 1/2 Package Bacon, cooked and diced

– 1/4 Cup Fresh Cilantro

Preheat oven to 425.  Spread pizza crust with enough barbeque sauce to leave about a 1/2 inch border around the edges.

In a bowl, mix together about 1/4 cup barbeque sauce and about 1/4 cup ranch dressing.  Add the chicken and stir to combine.

Sprinkle cheddar cheese over the pizza crust and arrange chicken on top.  Sprinkle with bacon, then top with red onion.  Bake for 12-15 minutes, until cheese is bubbling.

Remove from oven and sprinkle with cilantro.

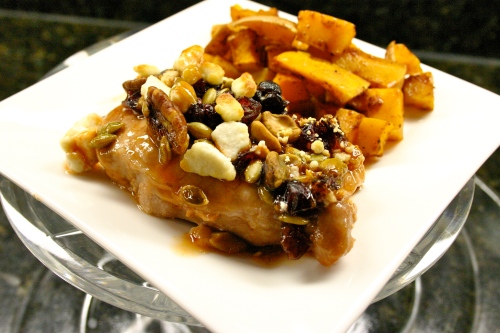
Easiest Ever Porkchops and Roasted Butternut Squash.

Around this time last year, my friend Shawn hosted a holiday cooking party.  She invited over a group of friends for wine, appetizers and dinner.  But before the big meal, she channeled her inner Giada and showed us all how quick and easy it was to prepare the super delicious, good for you meal.  Ever since, this meal has graced my table at least twice a month.  You can prepare and cook both the pork chops and the butternut squash at the same time.

Shawn’s Easiest Ever Pork Chops

– 1 Package Boneless Pork Chops, butterflied if preferred

– 1/2 Bottle Roasted Red Pepper Vinaigrette Dressing

– 1 Pacakage Goat Cheese, crumbled

– 1/4 Bag Trail Mix with Nuts, Seeds and Dried Fruit (I always use Trader Joe’s Oh My Omega Trek Mix)

Preheat oven to 350.  Arrange pork chops in a baking dish and cover with dressing.  Top with goat cheese and trail mix.  Bake for 35-40 minutes.

Shawn’s Roasted Butternut Squash

– 1 Butternut Squash, cubed (I leave the peel on to add extra nutrients, but you could certainly peel it as well)

– Honey (a big drizzle should be enough)

– Cinnamon, to taste

– Nutmeg, to taste

– Cayenne, to taste

Preheat oven to 350.  Mix all ingredients together and pour into a baking dish.  Bake for 35-40, until tender.

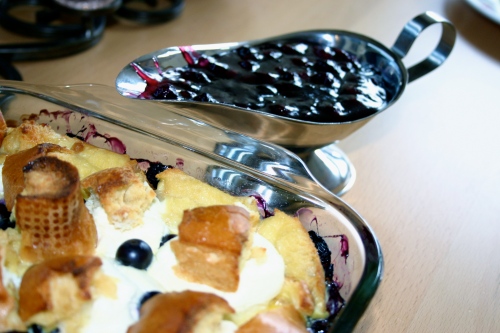
Overnight Blueberry French Toast.

Instead of getting up at 2am to score some Black Friday deals (which I’ve never really understood, anyway), we slept in and went bowling with the family instead.  My in-laws spent the night after our Thanksgiving feast so I prepared this dish to devour in the morning at the same time I was making Thanksgiving dinner.  It was easy to assemble, I didn’t have to worry about getting up early and was able to spend more time with my family.

Overnight Blueberry French Toast – slightly adapted from Allrecipes.

– 1 Loaf Crusty Bread (I used Italian Bread), torn into small pieces

– 2 Packages Cream Cheese, cut into cubes (about 6-9 cubes per package)

– 1 Pint Blueberries

– 10 eggs

– 2 Cups Milk

– 1 tsp. Vanilla

– 1 tsp. Cinnamon

– 1/2 tsp. Nutmeg

– 1/3 Cup Maple Syrup

For the Sauce (to be made just before serving):

– 1/2 Cup Sugar

– 2 Tbsp. Cornstarch

– 1 Cup Water

– 1 Pint Blueberries

– 1 Tbsp. Butter

Spray a large baking dish with cooking spray.  Layer half of the bread with cream cheese, then top with blueberries and the rest of the bread.

Mix together the eggs, milk, vanilla, cinnamon, nutmeg and maple syrup.  Pour over bread cube mixture and lightly press down, using a spatula.  Cover with foil and refrigerate overnight.

In the morning, take the french toast out of the fridge about a half hour before you start baking.  Preheat the oven to 350.

Keeping covered, bake 30 minutes.  Uncover and bake an additional 30 minutes until eggs are cooked through and the surface is lightly browned.

During the last half hour of baking, make the sauce.  Mix together the sugar, cornstarch and water in a saucepan and bring to a boil.  Cook 3 to 4 minutes, stirring constantly.

Mix in the blueberries, reduce heat and simmer 10 minutes, stirring occasionally.  Stir in the butter.

Serve with the french toast.

WB Challenge #2 – Bacon and Cheddar Apple Pie.

This month’s theme for the What’s Baking Challenge was a fitting one for November:  Thanksgiving.  I hope everyone was able to spend time with family and friends and sufficiently stuffed your faces with turkey.  I know I certainly have been.  It’s leftover city around here…. Not that I’m complaining though.

While Thanksgiving has always been my Dad’s holiday, for the past couple of years, I’ve slowly been given more responsibility for our grand feast.  Last year, we hosted at our house (30 people!!) so we decided to make the turkey and take care of the appetizers while Dad made all of the sides and pies.  This year, we did the same thing but on a much smaller, more manageable scale of only 10 people.

I’ve been making this pie for the past 3 or 4 years and it’s always a hit on our Thanksgiving dessert table.  It takes a simple apple pie and elevates it to another level.  The addition of the cheddar and bacon to the crumble topping gives the pie just a little bit of that savory kick.  It’s not overwhelming, it just gives your palate a slight wake up call.

Bacon and Cheddar Apple Pie – slightly adapted from Rachael Ray

– 1/2 Package Center Cut Bacon

– 1/2 Cup Flour

– 1/3 Cup Brown Sugar

– 3 Tbsp. Unsalted Butter, chilled and cut into small cubes

– 1 cup Shredded Extra Sharp Cheddar

– 4 Golden Delicious Apples – peeled, cored and sliced

– 1/4 Cup Sugar

– Zest of One Lemon

– 1 Frozen Pie Crust, prebaked according to package directions

Preheat oven to 400.  Cook the bacon in a skillet over medium heat until crispy.  When bacon is cool to the touch, crumble and set aside.

Combine flour, brown sugar and butter cubes in a medium bowl.  Using your fingers, pinch the butter into the flour and sugar until crumbly.  Stir in the bacon and cheese and refrigerate.  This part can be made up to 2 days before use.

Toss apples with sugar and lemon.  Transfer to the pie crust and sprinkle bacon mixture on top.  Put the pie crust on a foil lined baking sheet and bake 15 minutes.  Cover with foil and bake another 45 minutes.  Cool before serving.

Oh Hi, I’m Over Here Now!

Welcome to my new food blog!  Isn’t it pretty?  I made the move after noticing that my other blog, A Jey in the Life, had completely been taken over by food while ignoring all of the other topics it was originally meant to include.  A Jey in the Life still will still continue to exist and will be updated in it’s new form in the coming weeks, so keep your eyes peeled to the screen for the newly redesigned blog over there!

Let’s get cooking!!

Baked Rigatoni with Spinach and Meatballs.

Happy Friday, everyone!  This blog update is actually a two-fer.

A few weeks ago, we had some spaghetti and meatballs that a friend had made.  Turns out, the Fruitaholic really went crazy for the meatballs.  When I asked my friend for the recipe the other day, she kind of laughed and said that they were from Trader Joes!

So, I was all set to run over to TJ’s to stock my freezer when I came across a recipe for a pasta bake with mini meatballs.  BINGO.  I had found tonight’s dinner, and already had most of the ingredients at home.

I tweaked the recipe a bit for both the meatballs and the pasta bake and they came out great. I added an entire bag of baby spinach, which allowed me to “sneak” another vegetable into the Fruitaholic’s diet.  I’m really glad that we decided to split the dish into two small casserole dishes and freeze one so that we have another one waiting for a day when I’m too lazy to cook!  We used all of the meatballs in the pasta bake (except for the 6 or so that the Fruitaholic gobbled down) so I’m going to make another batch for the freezer this weekend.

This recipe can be made even healthier by using whole wheat pasta, adding additional vegetables, and subbing ground turkey or chicken for the ground beef.  It’s super adaptable, which I love!

Baked Meatballs – inspired by The Parsley Thief

– 1 Lb Ground Beef
– 1/2 Cup Panko
– 1/4 Cup Parmesan
– 1/4 Cup Fresh Parsley, Chopped
– 1 Egg, Lightly Beaten
– Generous Splash of Milk
– Generous Splash of Worchestershire
– Salt and Pepper, To Taste

Preheat oven to 425.

Combine all ingredients and mix gently by hand.  Form into balls (size of your choice) and place on a lightly oiled, foil lined baking sheet.  Bake for 12-25 minutes, until browned and cooked through.

Baked Rigatoni with Spinach and Meatballs – inspired by and adapted from The Parsley Thief

– 1 Tbsp Olive Oil
– 1 Onion, Chopped
– 4 Cloves Garlic, Smashed and Sliced
– 1 Can Diced Tomatoes, Drained
– 1 Jar Pasta Sauce
– 1 Box Rigatoni, Cooked Al Dente
– 1 16 oz Bag Baby Spinach, Chopped
– 1/4 Cup Fresh Parsley, Chopped
– 1 Container Ricotta
– 1/4 Cup Parmesan
– 1 Container Baby Mozzarella Balls, Halved
– Baked Meatballs (see above recipe)
– 1 Pinch Nutmeg
– Salt and Pepper, To Taste

Preheat oven to 350.

Warm olive oil over medium heat.  Add onions and garlic and cook until softened, about 5 minutes.  Add tomatoes and cook 10 minutes.  Reduce heat to low, add sauce and cook an additional 10 minutes.

In a large mixing bowl, combine spinach, parsley, ricotta, parmesan and nutmeg.  Add pasta, meatballs and sauce and mix to combine.  Reserve some sauce for serving.

Transfer to baking dish and top with mozzarella.  Cover with foil and bake for 20 minutes.  Remove foil and bake until browned, about 5 minutes.